Saturday, October 29, 2022

Carrizozo Gets Industry Tracks

 June of 2022 was my last post, with my wife out of town, 2 week vacation, and wiring chores on the layout there hasn't been much to post until now, my how time flies! For this post I have several things to mention. New trackage for the town on the layout called Carrizozo NM, name change for Santa Fe Yard, how things went at my first time selling at the New Braunfels TX model train show and swap meet, and finally something new I'm going to perform on all my rolling stock on the layout.


First off, I have completed industry tracks for the town of Carrizozo NM. Carrizozo is the town on the layout just at the top of the helix as the tracks curve away from it. Going thru some of the track plans and ideas for industry spurs on Pintrest, I noticed a bunch of plans had a track diamond included in the plan to get to that out of the way industry that needed rail service. I decided I wanted to include a track diamond and also a long runaround. The following pictures show the track plan as it is now in the town.


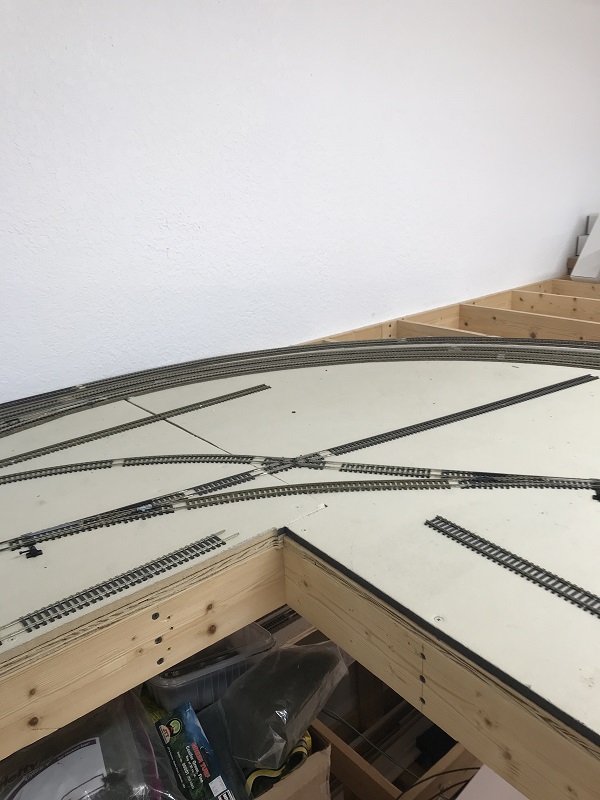
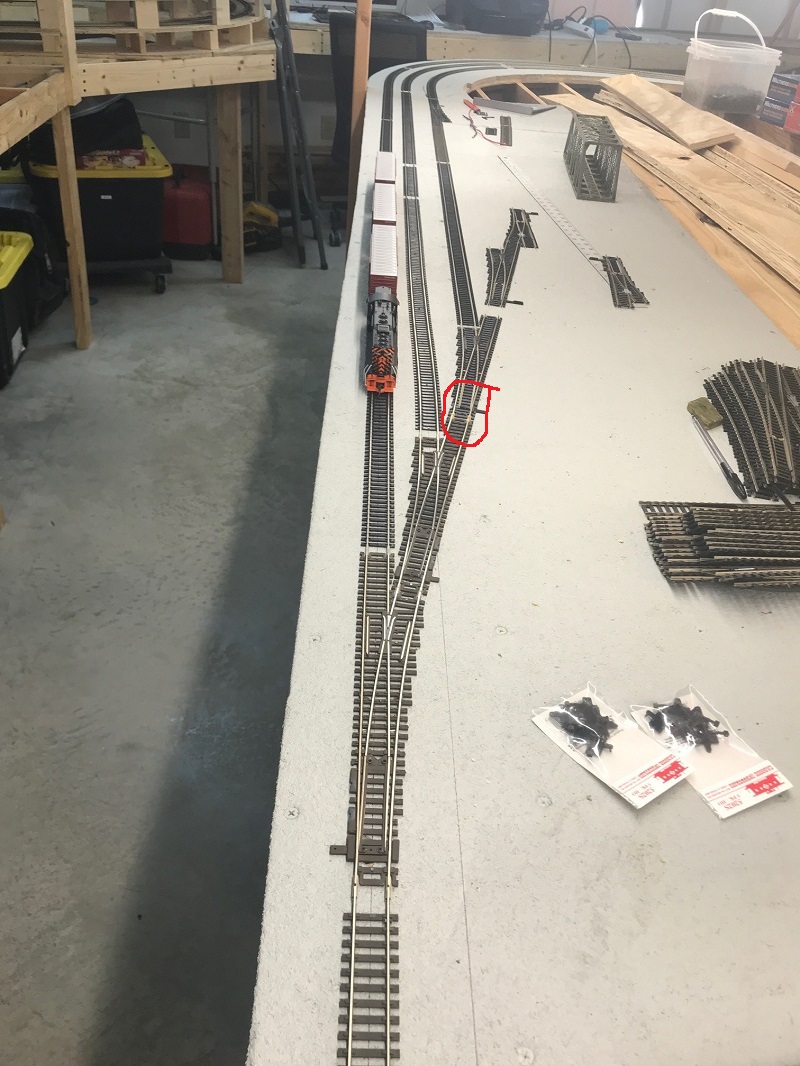
This photo shows Carrizozo looking north, the helix is directly behind the camera. Looking in the foreground, the far right track is the lead track to another small industry just north of the right most turn out. The middle, and left most tracks will be for a small grain/feed-mill operation. The straight tangent track just after the turn out for the left most track, (about middle of the picture), will be another right hand turn out added for a spur track. This track will stub end into the opposite side of a very interesting building I found while attending a train show this past month. In combination with the structure I found, there will be a grain bin, or a single or double grain silo with a few small auxiliary buildings. 


 The photos above show the interesting structure I purchased at the New Braunfels train show. The building does need a little work to be presentable, cleaning and painting. The bottom photo shows the place where the new spur tack will stub end into the building for a hopper car spot. I'm sure this was probably for a road semi truck loading spot but, eh, there's a loading dock next to it for truck traffic. I'm using it for a rail car. The top photo shows the chute for the hopper car spot and has a loading dock which I think I might have to extend a bit for a boxcar spot. All in all I thought it was a unique building perfect for this place on the railroad.


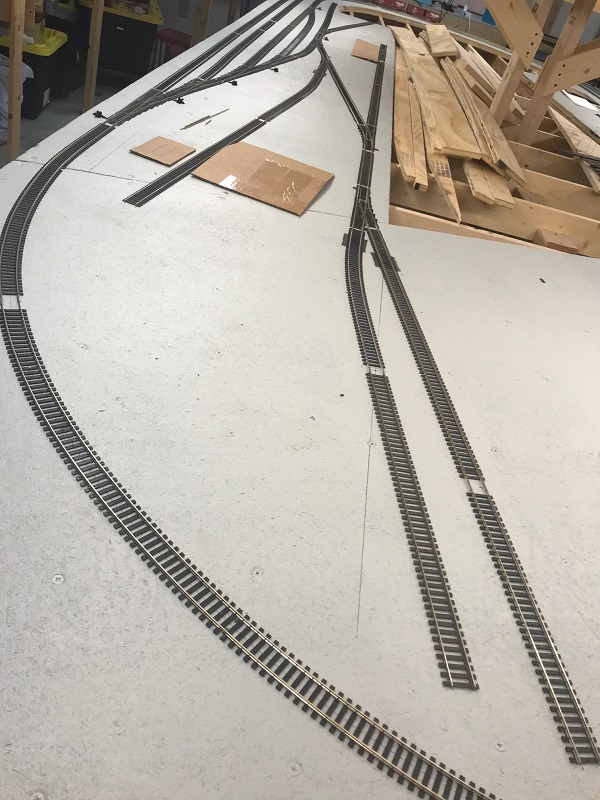
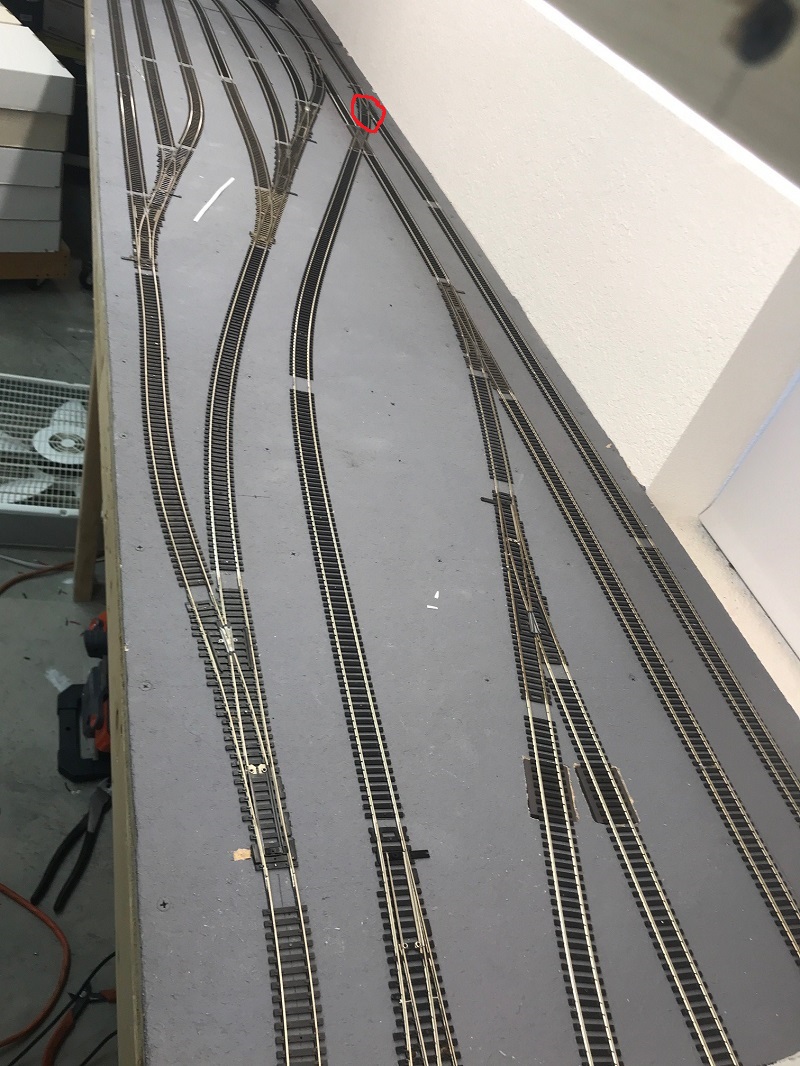
Carrizozo looking south. In the foreground is the lead track for the industry spur just opposite it with some MOW (maintenance of way) equipment parked on it. At this point I am undecided as what industry to put on this spur, maybe a team track, small chemical or fertilizer plant or something all together different. Up in the air is still a possibility of putting a small industry with a single car spot at this end. The track to the far right is the branch line main to Yrbi and the middle track is the main with turnout splitting to two tracks which are the beginnings for the double main to the helix. The turnout in line just off the split for the double main is the beginning of the runaround for Carrizozo.


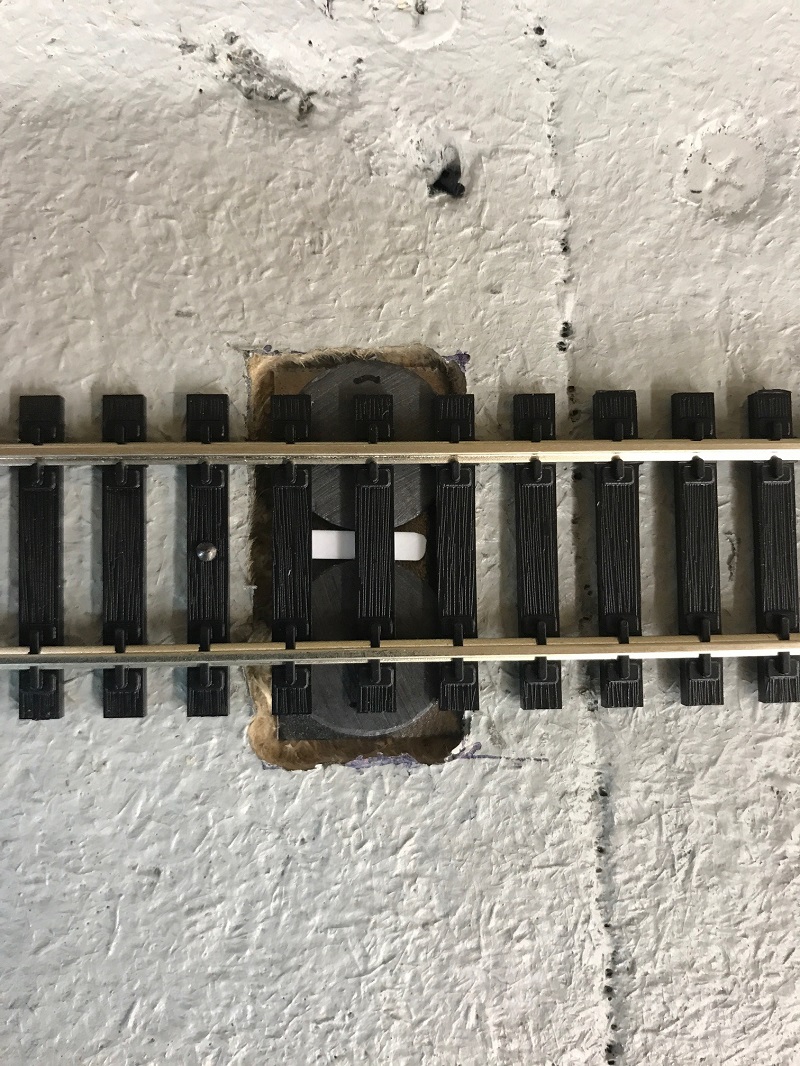
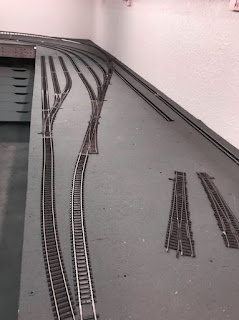
The above two photos show the track diamond or crossing for the future small aggregate or cement industry to be serviced by the railroad. The crossing is a Shinohara 45 degree crossing.


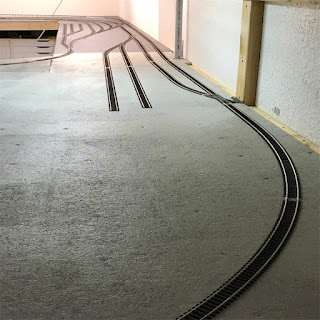
 This photo shows the Carrizozo run around.


The industry trackage in Carrizozo is next on the list for wiring. I had just recently finished the wiring for industry trackage in Orogrande and El Paso.


 Now for my report on the train show. My first train show where I was a selling vendor was a very successful one. I sold off rolling stock, RTR and kits mostly, and a few locomotives. I desired to sell off more of my NS roster that I have accumulated over the years but ended up only selling one Proto 2000 SD60M, at first I sold both Proto SD60Ms but one was returned because it wouldn't run. After bringing it home and disassembling it, I found that the dreaded lube that turns to concrete had seized the worm gears. I should have known better to test run these before taking them to be sold, but they had never been out of the box and were brand new, live and learn. NS is seen in pool power a lot in UP trains here in Texas but all in all not that popular here, may be the reason for the units I had not selling very well. I did sell one SP Black Widow scheme F7A which was a Stewart w/Kato drive, and older Athearn blue box ATSF Warbonnet FP45 that had been re-motored with a Mashima Can motor, super detailed, weathered and ran very well. As mentioned before most of my success was from the rolling stock I sold off. Kits and RTR, mostly assembled Athearn blue box. I had the prices set at $7 each, or 3 for $15, or 5 for $20 and most of them had Kadee couplers with a few having Kadee wheel sets. I was able to sell 2 Auto-Max cars which I was so happy to finally be a rid of! Those things are huge!, And came out long after the D&RGW era.


One step I have started to take is to weather the wheels and trucks on my rolling stock, even if the car itself is not weathered I think having the trucks and wheels weathered helps them stand out on a non-weathered car. Weathering on the cars will take place at later date as this takes a bit more time to perform where weathering trucks and wheels is a simple start to the weathering process. Below is an example of one car that I completed the process on, and yes the whole car needs a weathering job badly. Not all cars will have the same effect done to them as far as colors and technique goes. I will add washes and powder washes to lighten and highlight as well, or not, just depends on what I want to experiment with at the time. With the car below I simply painted the wheels with a micro brush using Polyscale rust and the truck frame a grimy black acrylic paint. Micro brushes are a great tool to have as they give you more control as where to put the paint. 


And finally to close this post out. I renamed Santa Fe Yard to Falagrady Yard. The name Falagrady comes from very good family friends of ours and especially my Mom and Dad. I named it after them in their honor. The Falagrady name was a household name in my youth and I always liked the name. On a visit to my Mom and Dad's place we got to talking about Don and Faith Falagrady and they're family. I had it in the back of my mind to find a new name for Santa yard. That's when it hit me, I'll name Santa Fe Yard after the Falagrady family.

Sunday, August 14, 2022

Home Made Uncoupling Magnets

Some modelers like them and some don't. I am one of those that do like them and use them on my layout. However, I've come to find that I'm getting tired of making Kadee rich by buying their under the track uncoupling magnets at close to $5+ each for them. So, I decided to come up with my own home made uncoupling magnets. I'm sure maybe some one has thought of or come up with this idea before me. Ever since I found a couple packs of small round ceramic magnets, that I can't remember if I got them from the local Hobby Lobby or Michael's or some off brand craft store that I visited with my wife in the past, I've wanted to experiment with them. What I've com up with is an uncoupler that may cost no more than 50 cents a piece and probably less, that's quite a savings if you happen to have an extensive layout with multiple industrial spurs.


Materials used:

1. Angel Craft ceramic magnets 5/8" round by 3/32" thick. I have found a different version of ceramic magnets at Hobby Lobby and they are 3/4" round by 3/16" thick with a brand name of Imagination Station  with a cost of $7.99 for 50 pieces which will make 25 uncoupling magnets.

2. .100 X .100 by 1/2" long square strip styrene

3. 1 sheet of 22 gauge sheet metal 6" X 18" from Home Depot. this was used to make the reinforcement for the magnetic field and it did make a difference. they were too weak with out the sheet metal reinforcement.


The photos below shows the final product installed and not installed.


The photo below shows the magnets that I had bought years ago and finally decided to experiment with. The brand name is Angel Craft and I did some searching online to find them but was unable to locate to figure a price for the uncoupler itself. There was 16 discs to make 8 uncouplers. I had 2 packages and as you can see I can make 3 more. 😁


Since I have not been able to find the Angel Craft magnets and can't remember where I got them, here is the magnets I have bought from Hobby Lobby. I have not built an uncoupler with these as of yet so I don't know how strong they will be or if they will need the sheet metal reinforcement or not. They are a little wider at 3/4" and a little thicker at 3/16".


Here is the sheet metal used. I used tin snips to cut a strip 1 3/8" long by 11/16" wide for the Angel Craft magnets. The sheet was purchased for $7.51 from Home Depot.


To determine which side the discs needed to be face up for the best performance, I held the magnet faces together on both sides. The faces either attracted each other or repelled each other. I found the faces that attracted each other are the faces that need to be positioned face up. I marked them with a fine point permanent marker, just in case they got dropped, too close to other magnets, or metal and slapped themselves together. The strip styrene was used to space the discs apart to get them to draw the coupler trip pins to either side.

The only draw back with these is the margin of error in car placement is tighter for uncoupling because of the smaller surface area as compared to the Kadee magnets. I tried to locate some small inexpensive rectangular magnets that better simulated the Kadee magnets with out success. I did locate some larger rectangular magnets and experimented with them but they were too powerful and forced the couplers open if the cars just rolled over them.

These homemade uncouplers work fine for HO but I'm not sure how they would perform for N scale. I have seen quite small discs that may be useful for N scale. Maybe this will inspire some one modeling in N scale to experiment. 

I have a video on my YouTube channel that shows how these uncouplers perform. Here is the link:


Wednesday, June 15, 2022

Industry Spurs For Orogrande and El Paso and a New Name for El Paso Yard

I've been quite busy over the past month. I finally have come up with a name to replace El Paso Yard. The name for the yard from this time forward will be Reddington Yard. I have also added industry spurs to the town of Orogrande and started industry spurs for El Paso too.

I will first start off with how I came up with the name change for El Paso Yard. I started out scouring for catchy names by looking at street names, businesses, parks, and any kind of name that caught my eye on the Google Map of El Paso Texas. I found a few possibilities and added them to my Apple Notes list on my phone so I could contemplate them over and over in my mind for a few days. In the meantime, I had started watching a streaming program on Netflix called The Blacklist. I was so intrigued with one of the main characters, Raymond Reddington played by James Spader, that I decided Reddington was a possible rename for El Paso Yard. I liked the way Reddington Yard sounded so I went with it. Along with changing the name I had to go through the process of adding the track names and other details along with a few new routes to the JMRI car forwarding program Operations Pro.


Newly renamed Reddington Yard in El Paso loaded with rolling stock.


Next, I have added industry spurs to the town of Orogrande. Orogrande will have three maybe four industries on the railroad. I have decided on 2 of the industries and thinking about the third. One of the two will be a canning company and the other will have something to do with grain. Below, I found a grain facility while looking around Google Maps and I would like to duplicate this in some way for the grain industry for Orogrande. The location is Hartline Washington. Unfortunately the street view is limited so the only reliable photo I have is what is seen from the top. I guess I need to plan a trip to Spokane WA and drive to Hartline and get some photos.


Orogrande looking from the south.


Orogrande looking from the north. I had to tilt the camera a little to get the spurs in the shot.


Looking at the photo above the two spurs to the right would be the grain facility mentioned earlier and you can also see the canning company spur with the footprint of the building.


Moving on, I have started spurs for El Paso and have also completed the run-around track which is fairly long. In the photo below, you can see some rolling stock occupying the run-around track at the south end. The track the run-around extends from performs double duty as the lead track for industries for Orogrande and El Paso and as the main for the reverse loop for the continuous run option. El Paso will have two industries one, fairly large, called El Paso Paper Box and I have not decided as of yet for the other industry. Possibly something to do with aggregate or cement.


The beginnings of El Paso.


Here is the satellite view of El Paso Paper Box 


Well that's it for this post. If you like what you see, add your email to the follow by email box and follow along.


Sunday, May 15, 2022

A Reverse Loop Headache, Problem Solved!

Well after trying to run some double headed power with a train around the reverse loop, I was still having intermittent problems with a short in the location where the turnout off the main leads into the short section of track and the crossing for the interchange track. If I ran the locomotives uncoupled but, still consisted, there was no problem and then sometimes with them coupled there were no problems. I thought maybe a short through the couplers and the locomotive frames may have been a possibility. There were no problems with a single four axle unit or six axle unit running through. With more discussion with a friend, it was determined that there was just to much going on in that area and the DCC Specialists auto reverser couldn't keep up with it all, plus the transition from the turnout to the crossing isn't the most favorable one. This makes a case for me to learn how to make a hand laid crossing here sometime in the future with the correct angle to further smooth out the transition. It was kind of tough to get that short little section of track to curve the way it needed to. After the discussion, it was decided to move the insulated gap from the turnout just off the main to just before the open ended turn out a few feet from the crossing. With fingers crossed, the move was made. The picture below shows the change. The red circle was the old location for the gap and the yellow circle shows the new location for the gap.


After the gap was moved and a little rewiring underneath....success! Everything worked like a champ. Problem solved!


Tuesday, May 10, 2022

A Reverse Loop Upgrade

I have finally had something that was worthy of posting in the blog. Wiring is one thing that isn't much worthy for posting. Over the last few months that's all that has been taking place on the railroad since the last post. Wiring for power districts 2 and 3 on the bottom level has been completed. For review, power district 3 is the part of the railroad that exits at the bottom of the helix. Power district 2 consists of the trackage with the over and under loop that leads to the expanse over El Paso Yard. If I recall, in a past post I mentioned I wanted to rename El Paso Yard, wellll....I have yet to come up with a name that suits me. Some more research on my part needs to be done. With the beginnings of wiring the final power district on the botton level, (power district 1), I had connected a few drops to the main buss feed and had a short circuit after activating the power in that district, even though the reverse loop trackage was isolated. Turns out the isolated section needed to be expanded or reworked. This turned into a conundrum and a little confusion for me to get the wiring for the track that had been laid in it's at that time configuration.

The photo below shows where the reverse loop trackage comes back to the main with the yard lead,  and the arrival/departure track leads off the turnout ladder which was not part of the reverse loop isolated section. That's where the problem occurred. The ladder along with the turn out back to the main are circled in red. I should have taken a better picture but the trackage is no longer in this configuration and this is the only photo I had before changes were made.


The short occurred on the short section of track between the double slip turnout and the turn out off the main circled in blue in the picture below.


I knew that I had to extend the reverse loop isolated section to this point but the other problem was that then the lead track to the yard and the arrival/departure track leads would have to be isolated as well. It occurred I needed some advise, so I gave a good friend of mine a call to explain my confusion and predicament. After a few hours of discussion a solution was born. What needed to be done was remove the double slip turnout, circled in blue in the picture above, and replace it with a regular turn out for the interchange yard, in the foreground of the picture, thus still allowing access to the interchange for the yard operator's switching duties. The turn out off the main would be moved down, toward the camera, and a new track would diverge from it with a crossing at the interchange yard lead. 


The picture below shows the configuration as it is now with the added section circled in red.


This configuration allowed for the yard lead and arrival/departure leads to be separate from the reverse loop both physically and electrically. The track extending out of the red circle diverging off the turnout to the left of the photo is a whole new loop added to makeup the reverse loop. 

The next three photos show the new trackage that make up the reverse loop. The new addition is the innermost track.


The new trackage will serve double duty, not only will it serve as the reverse loop for the continuous run option but, also will be the lead track for industries in this area, which means all trackage connected to this will be part of the reverse loop eclectically. I don't foresee any problem with this as there will only be one operator making switching moves at one time.


The start and end of the reverse loop isolated section are shown in the photos below marked with a red circle at each end of the isolated section.


Hopefully the wiring in this district will be completed soon and trains can traverse the entire layout and efforts can be dedicated to the town industries. 


Friday, November 12, 2021

Mainline Track Installation Complete

 I have to say there has been plenty of progress since my last post.

I have run Romex and installed double ganged plugs for 120 volt power at points under the bottom level. This was done to supply the power to the command station and booster power districts power supplies, and layout lighting. This also makes it possible to turn on/off power to the entire layout with one wall switch. I also had to modify the boosters power supplies with a "delay on relay" and setting them to activate the boosters power supplies ten seconds after the command station came on. Digitrax boosters have known to confuse the command station if every thing were to come to life at the same time. 

On October 27, 2021 at 9:39 pm, the last section of track was installed on the Colorado & Rio Grande Central Railroad's mainline. Yeah!! Party On!!! The last section of track was installed in the town that will be known as Orogrande, NM. From what I figured using figures from XtrakCAD, the total mainline run and mainline only is 476.5 feet, give or take three feet. For a total run, not bad, I thought. The double track helix has 210 feet of track all together making the helix single line 105 feet roughly. 

Along with completion of the mainline I was able to complete track work for El Paso yard lead, arrival/departure tracks and related turnouts, caboose track, tracks for locomotive servicing facility, the return track to the mainline and southern turnout ladder for the arrival/departure tracks that make up the reverse loop. There was a track installed with a crossing on the main to represent an interchange with Southern Pacific along with two tracks for an interchange yard, and a siding for Orogrande which runs to El Paso. 


Picture of the El Paso yard throat along with the finished yard lead, the arrival/departure tracks with a locomotive escape track just left of the yard lead, the stub ended caboose track to the left of that and finally the mainline on the Woodland Scenics foam elevation sections to the farthest left.


A closer look (in order from the left) at the mainline, caboose spur, arrival/departure and yard lead. 


Pictured here (from the left) is the stub spurs for the El Paso locomotive facility, next to it, the yard lead and the next three tracks are the south end of the arrival/departure tracks with the turnouts and a double slip turnout to make the return to the mainline and complete the reverse loop. The far right track is the mainline from the north. Also pictured is the uncompleted, (at the time of this picture) track for the Southern Pacific interchange lead. The turn out in the middle of the page not joined will be a
spur for industry for the city of El Paso. 


Mainline and siding with open turnout that will lead to industry for El Paso.


Lower peninsula loop mainline and siding between El Paso and Orogrande.


The town of Orogrande with mainline and siding and open turn out for town industries in the back ground.


North end of Orogrande.


Another look at Orogrande looking railroad south.


I took this picture to show how the mainline's (back ground track) final descent and transition with the road bed. The arrival/departure and yard lead tracks in the center and the tail end of the locomotive facility track in the foreground are also seen.


Pictured here is the descent of the mainline with the caboose, arrival/departure tracks, and some of El Paso yard to the left.


Shown here is the completed Southern Pacific interchange yard with the Southern Pacific track crossing the main leading to points off the layout. Far in the background is the yard lead, A&D ladder and the El Paso locomotive faciltiy trackage.


Next project, with the completion of these sections of track in place, comes the tedious task of dropping feeds and district buss wiring along with wiring the reverse loop section with an auto reverser. Like mentioned before in other blog posts wiring is not very photo worthy or in my case not the most appealing part of building a railroad but it is very necessary. Other things to be completed are installing all the ground throws for the turn outs that need them, along with temporary ground throws for the mainline turn outs. The SP interchange yard will get uncoupler magnets and I will mount lighting under the upper peninsula for the bottom peninsula.

I'm excited about getting wiring done so I can start trackage work for the towns, expanding, and planning operations to include these towns. I'm also looking forward to shifting gears and getting involved with building structures for the towns and devoting some time to installing decoders in the CRGC Railroad's locomotive roster that need them and devoting time for signals. I also need to do some research and have some custom decals made with the railroad logo, after all I need to custom paint and decal a few locomotives with the logo. That's a topic for another post on the blog.

I'm also contemplating on changing El Paso Yard to something else since the yard is part of El Paso I thought a name to distinguish it from the city of El Paso would be fitting. Hmmm....(scratching my chin)....now to think of something unique. 


Friday, June 18, 2021

El Paso Yard

Over the past several months I have been taking on the task of getting the bench work prep for El Paso Yard, and El Paso Yard installed so the mainline could be continued. I also modified an unused automotive creeper to be an under the layout creeper.


 The first step was getting the subroad bed installed and painted so track and turnouts for El Paso Yard could be installed.


After painting was finished, track and turnout laying took place. I realized that I had run out of Kadee  under the track uncoupling magnets (the black squares) so the yard sat partly finished in the photo above as I waited for those to arrive. 


Here is El Paso Yard completed. The 4 yard tracks curving to the left are for roadbed supports and in the future bridge supports for the mainline to curve over the yard.


The next weekend after completing the yard I was able to cutout the curved sub-roadbed for the mainline and install. The picture above shows the cuved portion of the mainline and the mainline decent, to the right, being held down with a few weighted objects to hold things in place as the glue sets up.


After the glue had set up, I was able to continue installation of the cork roadbed and mainline track. Both the approach and decent from the bridge were made easy with Woodland Scenics 2% riser sets. The above photo shows the main line approaching the bridge to span over the yard.


The above 2 photos shows the curved mainline roadbed support. Which someday in the future will have a scratch built bridge to replace the plywood support shown here. It may be some time before this is completed for the fact that I have never scratch built anything and don't have a clue as how to accomplish it.


The completed yard with the mainline decent to the right. Next project will be to clear off the misc. building materials on the other lower peninsula so the mainline can be completed with the reverse loop, the city of Orogrande, and connections to El Paso yard. After all this is completed, the tedious task of wiring will have to be done. Ugh!


I took and an unused automotive creeper and turned it into and under the layout creeper. I needed one of these or something close to it to make it easier to wire and perform other activities that will need to be attended to under the layout on the lower level with out having to crawl around on the floor. This is what I came up with.


 If you like the blog please comment and sign up for email notices to follow along.